


- Premiere Tutotial
How to Reverse/Rewind Clips in Adobe Premiere Pro

Oct 29,2019• Proven solutions
It has become a recent trend that people want to watch their videos playing in reverse mode and for that reason they keep looking for some cool video editing software.
Adobe Premiere Pro is a powerful video editing and production software with loads of exciting tools which help you edit the recorded clips the way you want.
Many people find it difficult to operate at first and are often seen asking how to reverse/rewind clips in Adobe Premiere Pro?
Here is a simple step by step guide that will help you get the answer of this frequently asked answer.
You may also like:How to Crop Videos in Adobe Premiere Pro >>
How to Create Freeze Frame in Adobe Premiere Pro 2017 >>
Adobe Premiere Pro is difficult to operate for some people. It has a complex user interface and also the trial period is very short. That is why many people do not opt for Adobe Premiere Pro.
The best alternative of Adobe Premiere Pro is none other than FilmoraPro.
It is a professional editor that is easy to use. If want to have a editor both professional and easy, FilmoraPro is the one. You can use it to reverse video clip, audio clip or both without effort.
Besides reversing, you can also change video speed and resize your video. Free download it to have a try.
In order to help you reverse/rewind clips using FilmoraPro, we present a simple step-by-step guide:
- Import the clip that you want to edit or reverse.
- Select and Drag the clip to the timeline that you want to reverse/rewind.
- Search "reverse" at Effects library.
- If you want to reverse video clip, drag Time Reverse onto clip in the timeline.
- If you want to reverse audio clip, drag Audio Reverse onto clip as well.
- Now, it is done.


How to reverse/rewind clips in Adobe Premiere Pro Step by Step
- Launch Adobe Premiere Pro and click Import. Select the video clip that you want to edit.
- Right-click on the Clip's name in the Project Section of the Adobe Premiere Pro.
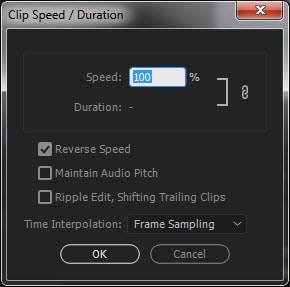
- Select Speed/Duration from the menu that opens from right-clicking on the Clip's name.
- Check the box right next to Reverse Speed from the dialogue box that opens.
- Click the OK button to reverse the clip.
- Drag the clip from the Project section onto the timeline.
- Click the Play button to watch the reversed clip.

Here is a video tutorial on how to reverse video in Adobe Premiere Pro
Conclusion
See this is as simple as that. But this can be very complicated for those people who like simple user interface and do not want to get into something that is difficult to operate. That is why most of the people start looking for alternatives. Here we recommend using FilmoraPro. It is the best video editor that is for intermediate users. If you want to have powerful and engaging video with easy to use interface, FilmoraPro won't let you regret!
Bring up your video to a professional level with straightforward tools.
Try It Free Try It Free
Liza Brown
chief Editor
0 Comment(s)